Self-hosting with Docker Compose, easy as 1-2-3


A common theme with managed cloud providers like Heroku, Netlify, Vercel, etc. is that self hosting is dangerous, difficult and complex. You'll hear this quite often, but for many use cases you're better off running it yourself. It's easier than you think!
We'll be going through how you can set up your own self-hosted apps using as much libre software as possible.
This article assumes basic knowledge of SSH and Linux. The author uses Arch Linux as a daily driver, so excuse her if she makes the implicit assumption you're also using Linux on your computer. You can Perplexity anything you don't know, right?
Getting a server

This doesn't need to be anything fancy. Any computer that can remain online 24/7 can be a server. This includes:
- Your old MacBook with a broken screen
- A Raspberry Pi 4
- The old office PC collecting dust
- An extremely beefy dedicated server with 6000 cores and 2 terabytes of RAM
- Any Sahara Compute Instance (We're partnered with them but they're really really good and I'd recommend it even if we weren't)
P.S. At the time of writing, this blog, along with other self hosted services, is running on an s.medium SCI. They've got unbeatable prices. Check it out!
Install Linux on that thang
Unless you're a masochist and hate yourself (plus you don't get to follow the rest of this guide since all these instructions are written for Linux), you should use a Linux distribution.
We like Ubuntu Server, a distro well known for stability and security. Other options exist such as NixOS, which allows you to configure your whole system in one file but suffers from compatibility issues with most Linux apps, as well as Fedora Server, CentOS and more.
x86 (Intel/AMD) computer
You'll need a USB drive for this.
First, you have to flash the drive with a Linux distro. There are easy to use tools like Balena Etcher as well as just using dd. If you're going to be trying out multiple Linux distros, I highly suggest you use Ventoy, which allows you to hold multiple Linux live ISOs on one USB drive!
You'll then have to plug the drive into your computer, boot it up and get into the BIOS to set your boot device to be the USB. After that, you can go forward with the installation process which should be straightforward.
It's highly recommended to set up an SSH key!
Ventoy does not work with old MacBooks (I've personally only tested with a 2013 MacBook Air) because they use a non-standard EFI boot process. Beware.
Raspberry Pi
Typically, you'll need a microSD card. Insert it into your computer and run Raspberry Pi Imager. When choosing an OS, select Raspberry Pi OS, though if you prefer to you can also use Ubuntu Server (just that Raspberry Pi OS is more optimized for the Raspberry Pi).
When configuring, make sure to create a user and password. Additionally, add an SSH key then disable password authentication.
Accessing SSH anywhere

This step may not be needed if your server is in the cloud. If you're running it at home, you'll need it. There are two options you can go for:
Port forwarding
You'll need to first set a static internal IP address (typically going 192.168.x.x or 10.0.x.x) on your device. You can do this on Ubuntu Server by editing /etc/netplan/00-installer-config.yaml and configuring it there:
network:
  version: 2
  renderer: networkd
  ethernets:
    ens33:
      dhcp4: no
      addresses:
        - 192.168.1.69/24 # Your static IP goes here
      nameservers:
        addresses: [1.1.1.1, 1.0.0.1]
      routes:
        - to: default
          via: 192.168.1.1
Yours should look similar to this but it could be different.
After which, run sudo netplan apply to apply the changes and verify them with ip a. If there are any problems, a reboot can't hurt.
On your router, set up port forwarding for port 22 to your static internal IP so that you can access SSH on the go, running ssh <your home ip>. The instructions are different for every router, so you'll have to dig into the settings for that.
If you have a dynamic external IP address, you should also set up No-IP which provides a domain name that always points to your IP address even when it changes. If your router supports it, you can enable it there directly. Otherwise, you'll have to use the Docker client for No-IP. (We'll get to installing Docker soon)
Tailscale
An alternative to port forwarding is Tailscale. This allows you to access your devices anywhere without having to reveal your server's IP address by creating a virtual private network ("tailnet") so that your computers can pretend to be part of the same network no matter where they are.
This is useful if you're only running services for yourself, a company or your friends as you don't need to (or necessarily want to) expose anything to the raw Internet.
Install Tailscale on your server and all the devices you want to use to connect to it. Make sure to configure them as part of the same tailnet.
Installing Docker

Docker is a tool that manages containers. In contrast to "traditional" packaging where all your apps are strewn across your server, Docker keeps all your apps in separate containers with their own libraries and dependencies to ensure reproducibility and security as well as avoiding dependency conflicts.
It also comes with a tool called Docker Compose which allows you to define a set of related containers together in a single configuration file along with any environment variables and storage volumes. This is helpful because an app is usually made up of multiple processes working together (think your main app, a database, reverse proxy, etc.)
For Ubuntu, the instructions to install Docker are the following:
# Add Docker's official GPG key:
sudo apt-get update
sudo apt-get install ca-certificates curl
sudo install -m 0755 -d /etc/apt/keyrings
sudo curl -fsSL https://download.docker.com/linux/ubuntu/gpg -o /etc/apt/keyrings/docker.asc
sudo chmod a+r /etc/apt/keyrings/docker.asc

# Add the repository to Apt sources:
echo \
  "deb [arch=$(dpkg --print-architecture) signed-by=/etc/apt/keyrings/docker.asc] https://download.docker.com/linux/ubuntu \
  $(. /etc/os-release && echo "${UBUNTU_CODENAME:-$VERSION_CODENAME}") stable" | \
  sudo tee /etc/apt/sources.list.d/docker.list > /dev/null
sudo apt-get update
sudo apt-get install docker-ce docker-ce-cli containerd.io docker-buildx-plugin docker-compose-plugin
sudo docker run hello-world
If you're using a different Linux distro, check out the Docker documentation.
Once you're done, it's also recommended to add your user to the docker group so you don't have to keep repeating "sudo" every time you want to use Docker. Note that anyone with access to the Docker socket effectively has full root access, so dish it out carefully!
# Adds your user account to the docker group
sudo usermod -aG docker $USER
# Reboots your server
sudo reboot
A Docker Compose primer

Finally, you've got your server all set up. Let's get you acquainted with some of the basic concepts of raw Docker as well as our good friend Docker Compose.
Docker Compose scopes resources such as volumes and networks by project. (The answer for "what is a project?" is "it depends.")
Let's look at an example Docker Compose file. We can call it docker-compose.yaml.
version: "3.8"

services:
  caddy:
    image: caddy:latest
    ports:
      - "80:80"
      - "443:443"
    restart: unless-stopped
    command: |
      sh -c "echo 'example.com {
        reverse_proxy hello-world:8000
      }' > /etc/caddy/Caddyfile && caddy start --config /etc/caddy/Caddyfile"

  hello-world:
    image: crccheck/hello-world
    restart: unless-stopped
This Docker Compose file serves Hello World on port 80 and 443.
Let's dive into exactly what it means. The services caddy and hello-world are created based on their respective "images". A Docker image is like a blueprint defined by a Dockerfile which Docker uses to create your container.
The statement restart: unless-stopped means that it will automagically restart if the process exits or crashes on its own, but not if you manually stop it.
Docker networking
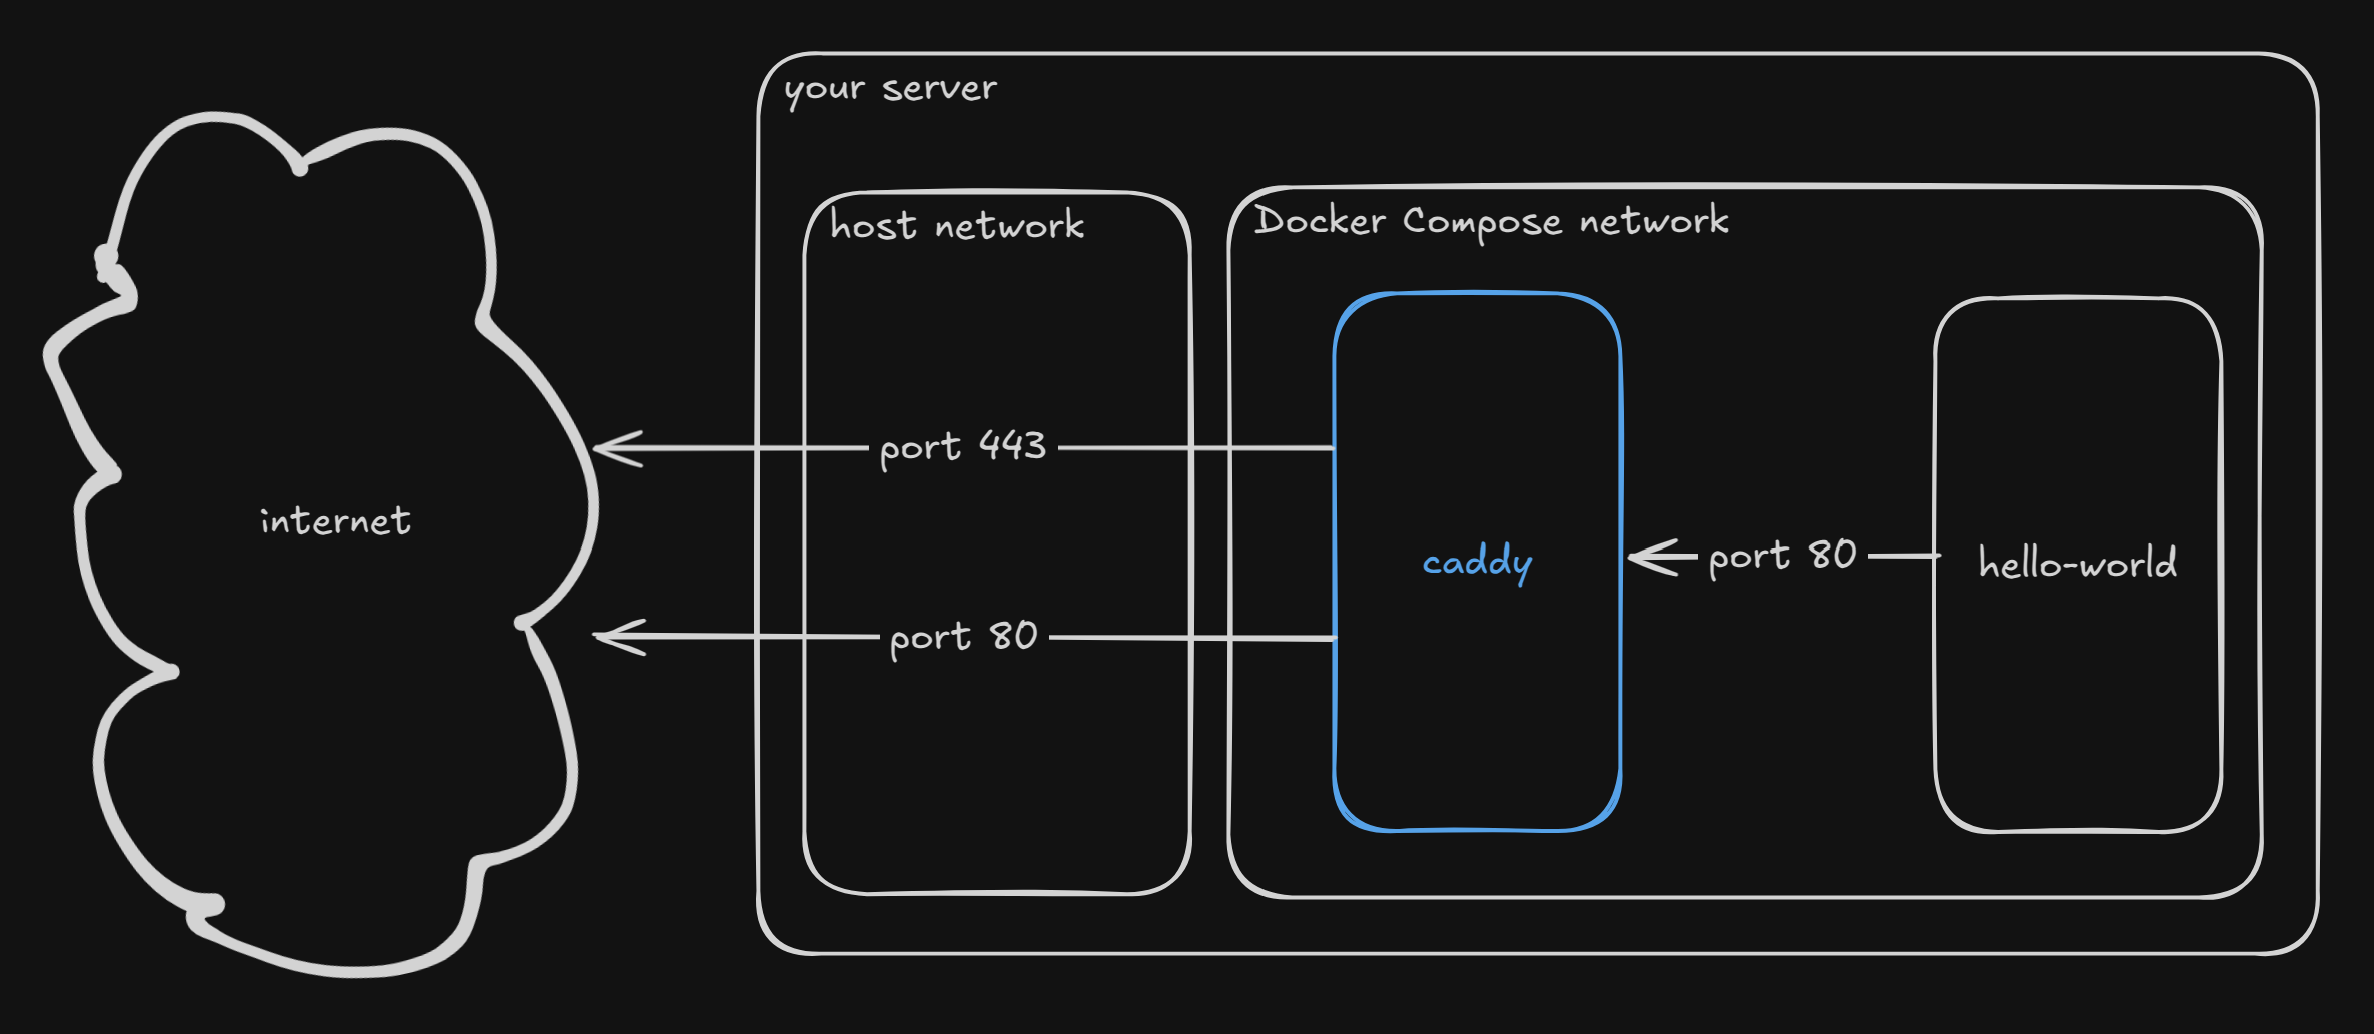
Caddy then binds to port 80 and 443 on the host network (ports). Programs running on the host network will be able to access hello-world, as well as anyone connecting to your server's IP address. (Docker also doesn't respect firewalls, but that's out of scope for now)
The reason why they can reach each other, even without hello-world doing any port binding, is because they are on the same Docker network. Services defined within the same project by default run on a Compose-generated network, and different projects will be unable to reach each other by default.
Custom networks allow you to put services from different projects together. Here's an example with a custom network:
version: "3.8"

services:
  caddy:
    image: caddy:latest
    networks:
      - prod
    ports:
      - "80:80"
      - "443:443"
    restart: unless-stopped
    command: |
      sh -c "echo 'example.com {
        reverse_proxy hello-world:8000
      }' > /etc/caddy/Caddyfile && caddy start --config /etc/caddy/Caddyfile"
    volumes:
      - caddy-data

  hello-world:
    image: crccheck/hello-world
    restart: unless-stopped
    networks:
      - prod

volumes:
  caddy-data:
networks:
  prod:
    name: arv-external-prod-01
This Docker Compose file also serves Hello World on port 80 and 443.
prod is a nickname we give to the Docker network arv-external-prod-01 inside our Docker Compose file. Docker Compose will create a new Docker network (if it doesn't exist yet) called arv-external-prod-01 and gives it the nickname prod for the purposes of our Compose file. The services which use that network must be explicitly marked with the newly created network.
Later, we can use this in a different Compose file, for example if we want to also bring in a database to the network. Let's take a look at that.
version: '3'

services:
  mysql:
    image: mysql:8.0
    restart: unless-stopped
    environment:
      MYSQL_ROOT_PASSWORD: your_root_password
      MYSQL_DATABASE: your_database_name
      MYSQL_USER: your_database_user
      MYSQL_PASSWORD: your_database_password
    volumes:
      - mysql-data:/var/lib/mysql
    networks:
      - arv-external-prod-01

volumes:
  mysql-data:

networks:
  arv-external-prod-01: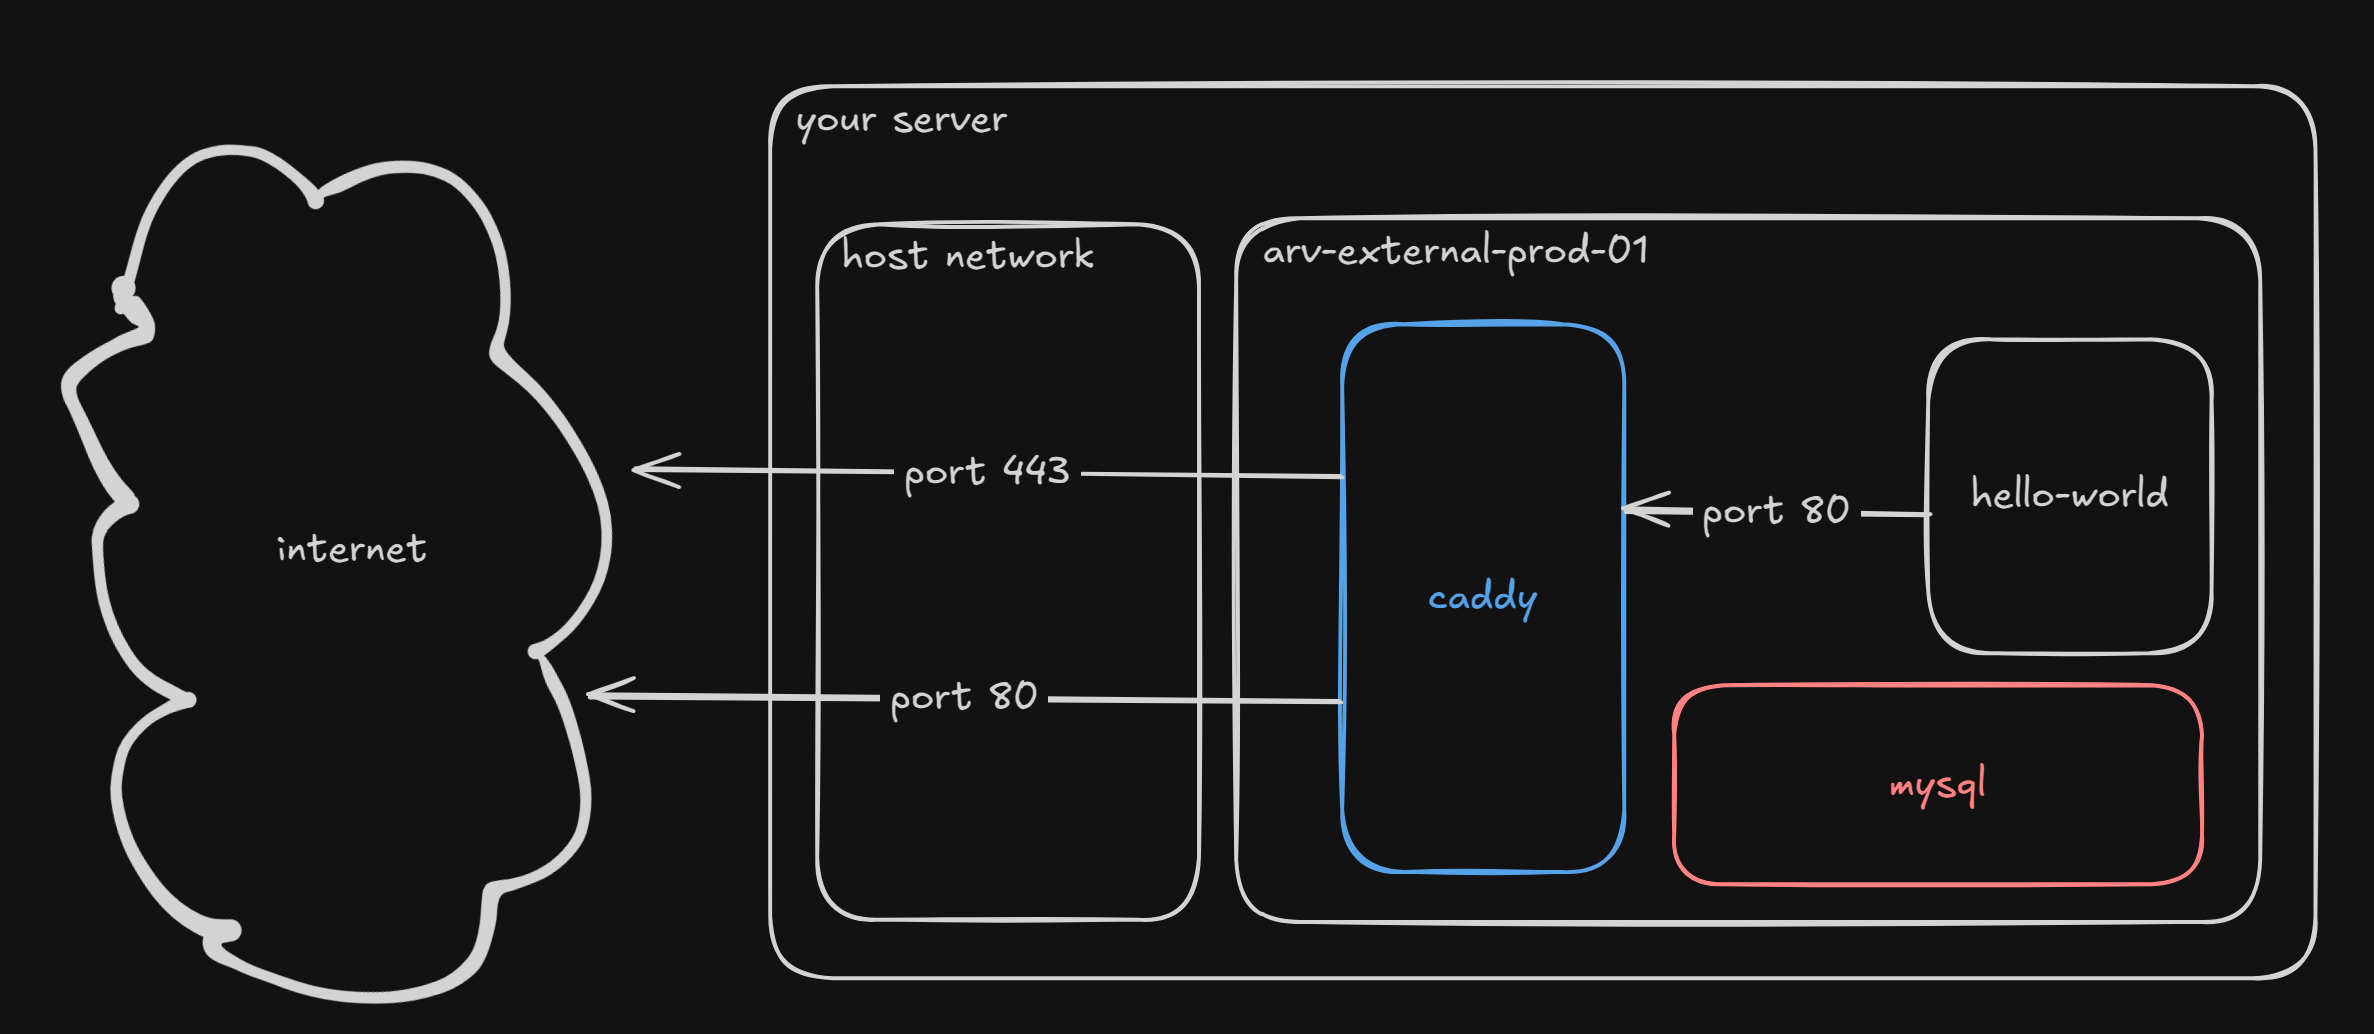
Docker volumes
Essentially, a volume is persistent storage for your Docker container. A Docker container can have multiple volumes, and volumes can be shared between them (but it's not recommended). There are also bind mounts which allow you to mount a file from the host onto the container, but you can read the documentation for those later.
Inside the MySQL Compose file, the mysql-data volume is defined and mounted to the path /var/lib/mysql.
Running services
You can run a ton of different services on your server, hooray! Here's some of them:
- Supabase: a libre Firebase alternative
- Ghost: the CMS this blog is hosted on
- Discourse: a forum used by tons of projects
- Synapse: a server for the federated chat protocol Matrix
- Jitsi Meet: a videoconferencing platform
- Mastodon: federated social media platform
- And more listed in awesome-selfhosted
Fitting everything together
We've created a GitHub repository with a very basic example Docker Compose configuration, helpfully annotated and ready to tinker with. Don't worry about messing up! Most parts of Docker Compose are reversible, so if you just bring back the old configuration it should be fine.